Monday, July 30, 2012

DIY bedroom bench

I found and used the inspiration and instructions found here and here make a bench for our soon-to-be (16 days!!) guest bedroom.  The whole project ended up costing about $45.  Here's how we did it! Please contact me if these directions don't make sense :)

Materials Needed:

  • coffee table, bench, OR 2 pieces of pressboard (12"+ x 36"+) and short (18") table legs
  • flat metal leg brackets (found at Ace or Home Depot)
  • 2" or 3" foam, from craft store
  • fabric for bench (enough to cover the area of the top of the bench + at least 10" added to each dimension)
  • batting (enough to cover area of top of bench + at least 10" added to each dimension)
  • wood screws
  • drill
  • Zinsser bonding primer
  • black satin spray paint
Step 1:  I found 18" table legs and 2 pieces of pressboard at a local thrift shop.  NOTE: make sure the boards are FLAT and not warped in any way.  Ours were warped and make extra steps to level the bench! You can use a small coffee table, that's at least 20" tall.  Our boards were 12" wide by 36" long.

Step 2: Using the flat metal brackets, screw the legs into the brackets.  You will need to also drill a hole large enough for the threaded table legs to fit into on the BOTTOM of your bench (one piece of board).  Our holes were 3/8" wide, and about 1/2" deep to house the threaded screws of the legs.

Step 3: Drill pilot holes for the flat metal bracket screws into the bottom of your bench board.  


Using the included screws with your flat metal brackets, attach the legs to the board, tightening the screws in a star pattern (top left, bottom right, top right, bottom left).

Step 4: prime and paint legs and boards, using a foam brush.  Lightly brush on the primer, covering all areas that will be painted.  Once dry, spray paint the legs and boards, holding the can 4-6" from the target.  I painted the sides and top and bottom of all pieces.  Allow to dry overnight or more.


Step 5: We bought 2" foam at Joanns, with a 50% off coupon.  It's pretty pricey stuff, so getting it on sale or using a coupon definitely helps!  We decided to go with the 2" thick foam, and use two layers of it.  At Joann's, it's a 24" wide piece.  We bought 1 yard (36").  Our bench boards were 12" wide, so we could just cut the 24" wide piece of foam in half, double layer it, and have a 4" tall bench cushion!

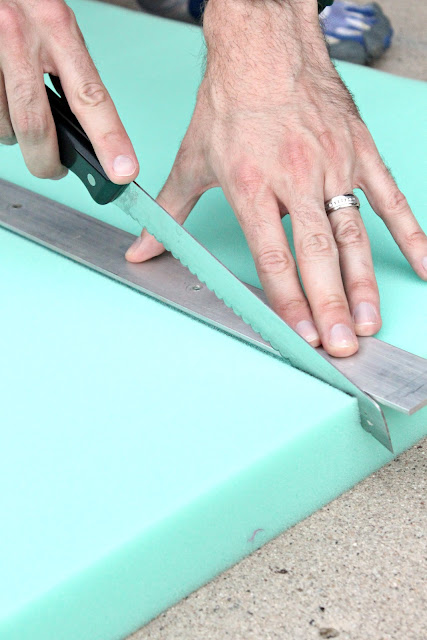
We measured and used a yard stick to draw a straight line on the foam, using a sharpie marker.  Using a bread knife, cut the foam in half.  It should cut like butter!


Step 6: Create the cushion!  Lay your fabric out first, and batting on top of that.  Both need to be long and wide enough to fit down over the foam and board, so it needs to be larger than the foam/board dimensions.  Lay the 4" of foam on top 7of the batting, and the NON-legged board on top of the foam.  Pull the fabric and batting tight up around the edges of the foam and board.  Using a staple gun, staple the fabric and batting to the board, TIGHTLY.  You may want to do the batting first, by itself, and THEN the fabric for a nice tight grip.  Staple one side first, and pull tight and staple the other side.


We finished the ends of the bench by doing hospital-style corners, or like a gift wrapping; bring the sides around the end of the bench, and fold the created V-shape of fabric down over the tucked sides, staple.

Step 7: combine the two pieces - the legged board, and the cushioned board. Place the two pieces together, and drill pilot holes up through the bottom of the bench, into the cushioned board.  We drilled a hole on all 4 corners.  Using wood screws, we attached tightened the two pieces together to create one solid bench.

Step 8: Viola!  Bench!
NOTE: We are going to be drilling holes between the bench legs (on the short side) - and adding a wooden dowel rod to stabilize the bench.  Because the boards were warped a bit, the legs don't sit level.

Monday, July 23, 2012

Guest room bedding

Thanks to my awesome friend Erin, I have found our guest bedroom bedding/comforter set!  KingLinen.com has TONS of comforter sets for very good prices, on sale!  I found this set, in charcoal gray, for $80.  I created a quick digital mockup with the pop of yellow, light yellow sheets, and our awesome DIY bench.  Eeeeek, I cannot wait for it to arrive!  The image makes the set look more a taupe, but I called the customer service and the gal assured me it's a true gray, not brown.
Image from KingLinen.com

Sunday, July 22, 2012

Mulling over...

I'm in the process of trying to find the perfect comforter/bedding set for our guest bedroom.  We hit Ross and Marshall's today, to no avail. I'm looking for a simple gray bed set, that I can accessorize with yellow, black, and white.  I would like it mostly gray, with a simple pattern or motif.  So. Hard. To. Find.  Here's a few mockups for visual, to include our fabulous bench, matching pillow, and the yellow element. (Don't mind the quality of the images!)
Overstock.com

Overstock.com

Overstock.com

 Amazon.com
 Ebay:

Friday, July 13, 2012

DIY: $12 headboard

In continuing with our guest bedroom, I wanted a nice bold headboard to set off the room.  I'm finally beginning to understand the "mix n match" style of interior decor, which is HARD for me.  I want a full set of MATCHING furniture.... so the idea of recycling old furniture and mixing designs in one room made my teeth itch to begin with!  However, I am slowly learning to trust my gut reaction with home items.  I LOVE bold colors and bold designs, but always think too much, "oh well that would stand out".  Well darn it!  This room is gonna stand out!  Brian and I spent an afternoon visiting the myriad of thrift and antique stores along the highway, looking for ideas.  We found the most perfect headboard at the "Second Chance Thrift" store.  The best part about it: everything in the store was 50% off!  So the $12 headboard... YES, $6.  Total score!  Along with the headboard, a can of Zinnser 1-2-3 primer, and 2 cans of Black Satin spray paint, and viola!  The perfect headboard for our guest bedroom.

Material Needed:

  • headboard to fit bed (ours is queen, 60" wide)
  • Zinsser 1-2-3 bonding primer (or cover primer)
  • Krylon black satin spray paint
  • wood filler (if applicable)
Step 1: prime the headboard.  Using a decent quality brush, lightly prime over all the surfaces of the headboard.  I chose to prime the entire thing: front, back, underneath areas, everything.  Allow to dry overnight.


Step 2: spray paint party!  I used up 2.5 cans of spray paint for this project.  It goes quickly!  Apply a light, but COVERING coat of paint.  Allow to dry for at least an hour.  I would recommend applying a second coat for even coverage.  Avoid spraying too close to the surface to avoid paint runs.


Step 3: Allow to dry and enjoy!


C O S T  B R E A K D O W N :
headboard: $6
2 cans spray paint: $6
primer: free with Ace Hardware coupon
TOTAL = $12

Wednesday, July 11, 2012

DIY: $40 bedroom chandelier

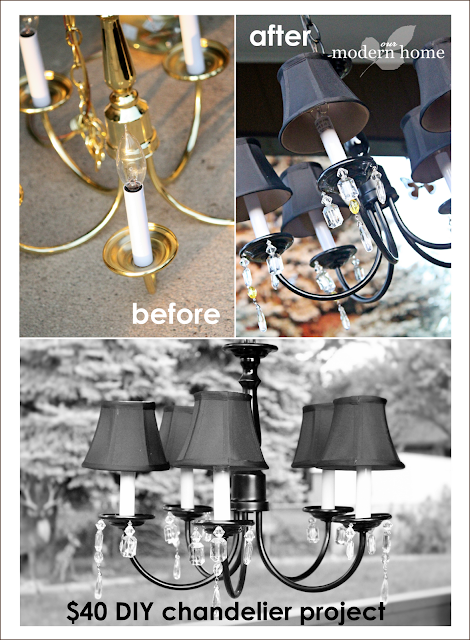
As promised, I'm writing out the step-by-step instructions for my most recent, and FIRST diy project!  I've done TONS of paper projects, but the whole home improvement and decorating DIY is new to me.  As I explained in my previous post, I fell in love with the gray/black/yellow bedroom look.  Modern, fresh, clean, and funky!  Totally the opposite of my normal personality and preferences.  The first thing I decided to work on was the hanging chandelier for the bedroom.

MATERIALS NEEDED:

  • an old chandelier
  • black spray paint :: I used the cheap $.96 bottle from Walmart, glossy black
  • clear or black beads
  • 24 gauge wire
  • hot glue gun
  • mini lamp shades
  • center punch + hammer
  • hand held drill with small bit
I searched on Craigslist, and found an old gold chandelier for sale, for $10.  It was hideous, and the perfect start to the project.

Step 1: Remove the existing light bulbs, and any covers over the wire/bulb bracket

Step 2: cover the wire/bulb brackets (paper towel, paper, etc).  I used sheets of paper, folded and taped around the brackets

Step 3: Cautiously using the spray paint, begin painting.  Keep the can about 4-6" away from the chandelier, as much as possible to avoid paint build-up and runs. Allow to dry overnight or more.  You can do a second coat of paint if you feel it's necessary.  I painted all the way up the chain, and the top ceiling dome cover also.

Step 4:  Prepare the bling!  I bought dropsy beads from Hobby Lobby, on sale for $.75 each.  Since there were 5 lamps on my chandelier, I decided to do 1 long dangle, and 2 short dangles on each lamp.  Using 24 gauge wire, I strung it through the clasp of my dropsy bead, and strung a yellow bead, and 2 clear beads onto each strand for the long dangles, and created the short dangles with just 2 clear beads.

I left about 1" wire strung past the bead dangles, to stick up through the lamp cups in the next step.


Step 5: Using a center punch (or sharp screw driver), hammer a divot in the lamp cups - I created 3 divots per cup, for the 3 dangles to hang from.  Using a 1/16" drill bit and hand-held drill, carefully drill a hole at each divot.  Keep your drill bit straight up and down, otherwise you may break a bit in half (which is what we did!).


Step 6:  Slide the 1" wire of your dangles up through the small holes in the lamp cups.  Bend the wire over to temporarily secure each dangle.  Using a hoe glue gun, glue the wires into the cups with a small dot of glue.


Step 7: Install new lightbulbs, if applicable.  Install lamp shades.


P R I C E  B R E A K D O W N :

  • chandelier: $10
  • lamp shades: 5 @ $2.55 each, Hobby Lobby 40% off coupons = $12.75
  • dangle beads: $8, Hobby Lobby 50% off sale
  • glossy black spray paint: $.96, Walmart
  • light bulbs: 5 @ $1.25 each = $6.25
  • 24 gauge wire: used existing
TOTAL = $37.96


And viola! ENJOY!

Tuesday, July 10, 2012

Project: Guest bedroom

Our new house has 3 bedrooms.  This is a SERIOUS upgrade from our little 2-bedroom apartment.  Needless to say, I'm VERY excited to have an official guestroom!  Someday this room will serve as our nursery, but not yet!  Normally, I'm an earth-tone sort of gal - beige, olive, rusty red, deep rich tones.  I'm also more of a rustic person at heart.  However, I have been given a vision for our guestroom - shades of gray, black, and yellow!  Why?  I have no idea.  I'm super excited about it, and have been obsessing over Pinterest to find ideas and mold and shape our third bedroom.  To explain my DIY projects, I'm starting at the source: my inspirations for said bedroom!

My main inspiration <swoon>, original source unknown:
COMPLETELY. IN. LOVE.

Other inspirations:
(source: decorpad.com)

(source: HGTV)

(source: homegoods.com)

So far, I have the chandelier almost done (will be posting DIY instructions soon!), and we found a queen headboard at Second Chance Thrift for $6!  I will be refinishing it and painting it black.  I'm on the lookout for an old dresser and nightstand to refinish also, and will be making a bench for the room to match.