Sunday, February 23, 2014

The Big Office Reveal!

Finally, the day has come! After much debacle with the fabric for my curtains, they are officially complete!  This will be a very shortened-version of the whole process, but I wanted to get the pictures posted for the big reveal.  I decided many many months ago that I wanted my office space to be done in a dark gray, navy, and blush pink palette.
After four years of wedding stationery design, I've seen a LOT of color combos, a LOT.  I have a few favorites: tangerine tango orange + purple, blush and gold, shades of champagne, but right now, hands down, I LOVE NAVY + GRAY + PINK.   I also chose to add accents of gold to the palette, to bring in a warmer feel.

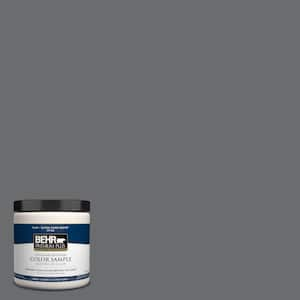
The first step was to paint the office.  I chose DARK ASH, by Behr (770F-5).  It's a beautiful SLATE gray, rich and even, with a slight blue tint.

Next, we built the gallery shelves.  I followed the instructions from this website!  Easy peasy.

Then came the little details: vases, collage wall, mirrors and frames, and lastly CURTAINS!   Long story short, I purchased 6 yards of PREMIERE PRINTS "Fynn" in Navy & White (not "Cadet Navy"!!!) from everydaychic on Etsy, and white curtain liner fabric at JoAnns.  Both fabrics are 45" wide, perfect for the window I need coverings for.  I ironed and hemmed the top of each curtain panel, sewing the liner fabric in the hem inside out.  The lining fabric was then flipped right side out, so both unfinished sides of the fabrics were together.  I ironed and hemmed 1/2" on the sides of each curtain panel, along with a 2" hem at the bottom of the panels, folding the lining fabric into the folded hems before sewing.

(excuse my just-out-of-the-shower au natural look lol!


Without further ado, here is my home office!  It's so clean, relaxing, and girly!  But not too girly lol!  A couple of things still need to be finished: hubby needs to put his pewter miniatures into the case on the wall, and I need to finish updating my fish tanks (new light strips, etc).  But all in all, it's ready to rock and roll!


Monday, August 26, 2013

Latest Projects

It's been too long!  I've been SO SO busy with the house, design work, family, and general life.  I know, I haven't posted here for MONTHS.  Sad :( :(  Wanted to post a few pics of my latest projects!  I re-stained my spoon holders (hand made by my dad!) as they were looking very dated and faded.  They are solid oak, and my dad originally treated them with a natural stain, to allow the oak to show through.  I chose "Red Oak" stain by MinWax.  Sanded them lightly (hand sanded) with a fine grit paper, and gave them two coats of the stain.  I do still need to wax finish them to give them a protectant coat.


I'm also beginning the process of re-doing our home office!  We have a "catch-all" bedroom right now that needs to serve as a craft room and home office space.  I am IN LOVE with the Ikea Liatorp set, but definitely do not have the money to purchase the pieces :( :(  So I'm doing it DIY / budget style!  I spray painted our desk to white, made a cabinet door for the CPU unit opening, and have a wall paint color picked out.  See below BEFORE pic (GAG!!!):

I've selected DARK ASH, by Behr for the wall paint:
BEHR Premium Plus 8 oz. #770F-5 Dark Ash Interior/Exterior Paint Sample

behr dark ash

The curtains will go and be replaced by quatrefoil or other patterned LIGHT curtains; I'm also planning to buy another desk to re-do, to allow us space for two computers.  The IKEA Expedit in on my radar as well for the shelf space and crafting table room.

Desk re-do!  Simple, quick, and easy.  I used American Accents Rustoleum glossy white.  Two coats.  It's a bit uneven on the top of the desk (some places are very glossy, some aren't); if I had lightly sanded, it may have done better.
Cabinet door: 1/4" pressboard (cut to size) + baseboard moldings.  I nailed the molding to the pressboard, and filled in the cracks and spaces with


Stay tuned in the coming months for the full reveal!!

Sunday, March 10, 2013

Peanut butter brownie bottom cheesecake | Recipe

Yes. You read the title correctly.  PEANUT BUTTER BROWNIE BOTTOM CHEESECAKE.  A little taste of heaven, I believe.


I found this recipe on Pinterest, from Roxanna's Home Baking site.  It is DELICIOUS.  I adapted the recipe to use what ingredients we had available and it still turned out AMAZING.

Find the original recipe here.

PEANUT BUTTER BROWNIE BOTTOM CHEESECAKE
Ingredients:
     Brownie Layer
       One box Jiffy brownie mix (or other brownie mix of choice)
       1/4 cup creamy natural peanut butter

     Cheesecake Layer
         8 oz. cream cheese, room temperature
         1/3 cup sugar
         1.5 eggs
        1 tsp vanilla extract
        1/4 cup greek yogurt

Instructions:
     1.  Preheat oven to 350.  Lightly grease and flour an 8-inch pie plate (or springform pan) or line with parchment paper.  Set aside.
     2.  Prepare brownie mix as instructed on box.  Add peanut butter to brownie mix.
     3.  Poor brownie batter into pie plate, and bake for 5 mins.   Remove from oven.  Reduce heat to 325.
     4.  In the meantime, prepare the cheesecake layer.  Mix together all the ingredients, making sure there are no cheese lumps, then pour over brownie base.
     5.  Bake for 45-55 minutes or until center is almost set.
     6.  Run a knife around the edge of cake to loosen from pie plate.
     7.  If you're using a springform pan, let cheesecake cool before removing.  If you're using a pie plate, leave the cheesecake in the plate.
    8.  Chill in refrigerator for at least 4 hours or overnight before cutting slices to serve.
    9.  Enjoy!

Sunday, January 13, 2013

DIY: Laminate wood flooring project!

We did it!  We laminated the upper level of our new house.  <swoon>  When we moved into our house, the entry foyer was vinyl (linoleum) along with the kitchen, and the dining room was.... CARPET.  Carpet in a dining room?!  Yeah.  Anyway, good ol' builder grade.

Sooooooo we decided that SOMEDAY we'd remodel that, and hardwood floor the area.  Down the road a ways.  A few years from now.  Haha.  We were making a weekly visit to Home Depot last week, for our trash drawer project, and AGAIN saw their pile of Hampton Bay laminate wood flooring, stacked so nicely in the front of the store.  And again, saw the price tag of $.99 per sq ft.

Ninety-nine cents per square foot.  After crunching a few numbers, we decided we could spend the $300~ on the project!  We called up a friend to help us DIY install it, to save some money as well.  He was happy to help, as he floored their house 5 years ago.  THE ENTIRE HOUSE.

Brian went back the next day, and bought 11 boxes of the laminate.  We bought a few misc. tools as well.  Yesterday, we got to work!  It was REALLY easy to do. We removed the carpet and vinyl first, and then all the baseboards. Eight hours of actual install time, and less than $400 later, and we have BEAUTIFUL wood floors.  With a 40 year residential warranty.  Yeah.  Happy dance!

Here's a cost breakdown:

  • 220 sq ft laminate: Hampton Bay "Saratoga Hickory" 8 mm
             ($.99 sq ft: 11 boxes @ $23 per box; ~$250 w/ tax)
  • laminate install kit ($18)
  • "QuikStep" underlayment, 1/16", 2-in-1 ($85)
TOTAL PROJECT: $353

Other items needed for install (borrowed or owned):
  • table saw
  • miter saw
  • hammers
  • pry bar
  • putty knife
  • nail gun
  • staple gun
We used the pry bar, putty knife, and hammer to remove our baseboards (hammer the putty knife vertically against the wall, between the wall and baseboard; do this along the length of the baseboard, and GENTLY pry off the baseboards)

I won't post a full instruction write-up for this; we followed the manufacturer's install instructions, along with the underlayment instructions included.

Long story short, you roll out the underlay; ours have a tape strip to tape to the next row.  We nailed a VERY few areas down just to hold the underlay in place.  Make sure to hammer them flush, or remove them before installing your wood.

Once the underlay is ready, start laying your wood pieces.  Ours were 6.25" wide by 48" long.  We cut smaller pieces with the miter saw, keeping them at LEAST 16" in length, and 3.5" wide. (to fit odd spaces)

Simply click the pieces together to make sure they are locked in place.  Continue through the room, finishing one row before starting the next.

Be sure to leave space for any MOLDINGS you need: at our front door, we'll need a "reducer" molding; we left 1 3/8" of space between the end of rows of wood and the molding of the front door, to install the reducer piece.

We also left 1.25" space between the wood flooring and our KITCHEN vinyl.  We'll install a T-molding there, as the heights of the floorings are the SAME.

The last row was a bit tricky, to make things fit.  Our flooring and room aren't 100% square in dimension, so we ended up with a slightly slanted last row against the wall.  Brian simply cut a 1/2" wide piece of laminate that would fill the leftover space between the wood and the wall/baseboards.

We had such a great time installing this, we're considering buying a few more boxes of the laminate, while supplies last, to floor our bedroom, closet, and possibly hallway.

Without further ado, here are some progress pics!


After peeling up the vinyl, Brian scored the pressboard underlay with a circular saw, set to the depth of the underlay.  After scoring it, he pried up the wood with a wonder bar


Floor demolition: THIS WAY!


All done!